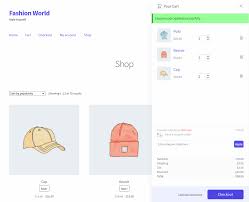
Enhancing your e-commerce store’s shopping experience is critical to improving conversions and customer satisfaction. A side cart for WooCommerce is a practical tool that streamlines the checkout process by allowing customers to view and manage their cart without leaving the current page. This blog will guide you through installing and setting up a WooCommerce side cart plugin to enhance your store’s functionality.
What is a Side Cart for WooCommerce?
A side cart for WooCommerce, often referred to as a WooCommerce popup cart or cart popup WooCommerce, is a sliding cart that appears on the side of your website. Instead of redirecting customers to a separate cart page, the side cart allows them to:
- View added products.
- Update quantities.
- Proceed to checkout directly.
This feature is particularly useful for improving user experience and reducing cart abandonment, as customers don’t have to navigate away from the shopping page.
Why Use a Side Cart in WooCommerce?
1. Convenience for Customers
The side cart WooCommerce plugin offers a quick and efficient way for customers to access their cart, ensuring they remain engaged with the shopping process.
2. Faster Checkout Process
Customers can make changes to their cart or proceed to checkout without interrupting their browsing, which helps in reducing friction during purchase.
3. Boost in Sales
By simplifying cart management, you can reduce abandoned carts and encourage impulse purchases.
How to Install and Set Up the Side Cart for WooCommerce
Setting up a WooCommerce side cart plugin is straightforward and requires no advanced technical skills. Follow these steps to get started:
Step 1: Choose the Right Plugin
To add a side cart for WooCommerce, you’ll need a plugin. Some popular options include:
- Side Cart WooCommerce by XootiX
- WooCommerce Popup Cart + Ajax by WP Overnight
- Flexible Side Cart for WooCommerce by QuadLayers
Each of these plugins provides unique features like AJAX functionality, design customization, and real-time cart updates.
Step 2: Install the Plugin
-
Log in to Your WordPress Dashboard:
Navigate to your WordPress admin panel. -
Go to Plugins > Add New:
Click on “Add New” to search for your desired WooCommerce side cart plugin. -
Search for the Plugin:
Enter the plugin name (e.g., “Side Cart WooCommerce”) in the search bar. -
Install and Activate the Plugin:
Once you find the plugin, click “Install Now” and then “Activate” to enable it.
Step 3: Configure the Plugin Settings
After activation, you’ll need to configure the plugin to align with your store’s needs.
-
Access the Plugin Settings:
Go to WooCommerce > Settings > Side Cart (or the equivalent plugin menu). -
Customize the Appearance:
- Set the cart’s position (e.g., right or left side).
- Choose colors, fonts, and button styles to match your store’s theme.
- Add animations for a more engaging user experience.
-
Enable AJAX Functionality:
Ensure the cart updates dynamically without requiring a page reload. This feature provides a seamless shopping experience. -
Set Cart Rules:
- Specify whether the cart should appear on all pages or just product and shop pages.
- Configure conditions for when the cart should open (e.g., after adding an item or clicking a cart icon).
Step 4: Add the Side Cart to Your Store
Once the plugin settings are configured, you’ll need to integrate the side cart into your store layout:
- Add a cart icon or link to your header, footer, or sidebar for easy access.
- Test the cart functionality by adding products and ensuring the side cart appears as intended.
Customizing Your Side Cart
A WooCommerce popup cart is more effective when it aligns with your store’s branding and user expectations. Most plugins offer several customization options:
1. Design
Adjust the cart’s design elements, such as:
- Background colors.
- Font sizes and styles.
- Button shapes and colors.
2. Cart Behavior
- Set the cart to auto-open when a product is added.
- Enable or disable specific features like quantity updates, coupon code entry, or remove item options.
3. Mobile Responsiveness
Ensure the cart is optimized for mobile devices, as a significant portion of online shoppers use smartphones.
Testing the Side Cart
Before launching, test the side cart to ensure it functions smoothly:
- Add Products to Cart: Check if the cart updates dynamically.
- Remove Items: Ensure items can be removed without errors.
- Adjust Quantities: Verify that quantity changes are reflected in real time.
- Proceed to Checkout: Confirm the cart directs users to the correct checkout page.
Best Practices for Using a WooCommerce Side Cart Plugin
1. Keep It Simple
Avoid overloading the side cart with unnecessary details. Focus on product names, quantities, prices, and action buttons (e.g., “Remove” or “Checkout”).
2. Highlight Promotions
Use the side cart to display ongoing discounts or free shipping thresholds to encourage larger purchases.
3. Monitor Performance
Track customer interactions with the side cart to identify areas for improvement, such as design changes or added features.
4. Optimize for Speed
Ensure the side cart loads quickly and doesn’t slow down your website.
Benefits of a Side Cart for WooCommerce
- Improved User Experience: Customers can manage their cart without leaving the page, making the shopping process smoother.
- Higher Conversion Rates: A streamlined cart process reduces cart abandonment.
- Increased Average Order Value: Highlighting promotions or upsells in the side cart can encourage additional purchases.
Conclusion
Adding a side cart for WooCommerce is a game-changer for e-commerce stores. By integrating a WooCommerce side cart plugin, you can provide customers with a seamless shopping experience that boosts sales and enhances user satisfaction.
Whether you’re running a small boutique or a large online store, the WooCommerce popup cart is an essential tool to improve your store’s functionality. Follow the steps outlined above to install, set up, and customize your side cart, and watch your conversion rates soar.
